
Input输入系统 (旧版)
Input类常用API
1. 鼠标在屏幕上的位置
屏幕坐标的原点 是在 屏幕的左下角 往右是X轴正方向 往上时Y轴正方向
返回值时Vector3 但是只有 x和y有值 z一直是0 是因为屏幕本来就是2D的 不存在Z轴
Input.mousePosition2. 检测鼠标输入
// 鼠标按下一瞬间进入(0左键 1右键 2中键)
Input.GetMouseButtonDown(0);

// 鼠标抬起一瞬间 进入
Input.GetMouseButtonUp(0);

// 鼠标长按按下抬起都会进入
Input.GetMouseButton(1);

// 返回值的 y -1往下滚 0没有滚 1往上滚, 返回值 是Vector2 我们鼠标中键滚动 会改变其中的Y值
print(Input.mouseScrollDelta);
3. 检测键盘输入
// 键盘按下:它只在key的状态从未按下到按的帧里才会返回true
Input.GetKeyDown(KeyCode.W);

// 传入字符串的重载,这里传入的 字符串 不能是大写的 不然会报错
Input.GetKeyDown("q");

// 键盘抬起
Input.GetKeyUp(KeyCode.W);

// 键盘长按
Input.GetKey(KeyCode.W);
4. 检测默认轴输入
// 键盘AD按下时 返回 -1到1之间的变换
float h = Input.GetAxis("Horizontal");

// 键盘SW按下时 返回 -1到1之间的变换
Input.GetAxis("Vertical");

// 鼠标横向移动时 -1 到 1 左 右
Input.GetAxis("Mouse X");

// 鼠标竖向移动时 -1 到 1 下 上
Input.GetAxis("Mouse Y");
Input.GetAxis和Input.GetAxisRow的区别
* Input.GetAxis: 这个函数用于获取一个特定轴的输入。在 Unity 中,输入轴可以看作是一个从-1到1或者从0到1的数值,表示了用户输入的方向或强度。例如,如果你有一个“垂直移动”轴,`Input.GetAxis("Vertical")` 将返回一个值,表示用户是否按下了垂直方向键,或者他们在垂直方向上移动了多大的距离。
* Input.GetAxisRow: 这个函数用于获取一个特定行(或按钮)的输入。在 Unity 中,行通常对应于键盘或游戏控制器的按钮。例如,`Input.GetAxisRow(0)` 将返回一个值,表示用户是否按下了键盘上的任意键(如果用户按下了任意键,返回的值通常为1)
input System(新版)
官方文档
参考文章
1. 导入Input System
1. 打开Unity的软件包管理器(菜单:Window > Package Manager)。从列表中选择input system包,然后点击安装。
2. 启用新的输入后端。(当你安装input system软件包时,Unity会问你是否要启用新的后端。如果你点击是,Unity将启用新的后端并禁用旧的后端,编辑器将重新启动)
3. 你可以在 Player settings(menu: Edit > Project Settings > Player->Active Input Handling)去修改输入后端,你也可以设置new、old或者两者兼容。
2. 键盘输入
获取当前键盘设备需要引入命名空间
UnityEngine.InputSystem
using UnityEngine;
using UnityEngine.InputSystem;
/// <summary>
/// 键盘输入
///
/// 作者: DY
/// 创建日期: 2025-01-09
/// 版本: 1.0
/// </summary>
public class 键盘输入 : MonoBehaviour
{
    Keyboard keyboard = null;
    private void Start()
    {
        // 1. 获得当前键盘对象
        keyboard = Keyboard.current;

        // 3. 通过事件监听按下,可以获得按下的值
        keyboard.onTextInput += (value) =>
        {
            // 注意点:如果长按,就会一直调用
            print(value);
        };
    }

    private void Update()
    {
        // 2. 单个按键 按下抬起长按
        if (keyboard.aKey.wasPressedThisFrame)
        {
            print("键盘a键按下");
        }
        if (keyboard.aKey.wasReleasedThisFrame)
        {
            print("键盘a键抬起");
        }
        if (keyboard.aKey.isPressed)
        {
            print("键盘a键长按");
        }

        // 4. 任意键按下监听
        if (keyboard.anyKey.wasPressedThisFrame)
        {
            print("任意键的按下");
        }
        if (keyboard.anyKey.wasReleasedThisFrame)
        {
            print("任意键的抬下");
        }
        if (keyboard.anyKey.isPressed)
        {
            print("任意键的长按");
        }
    }
}
3. 鼠标输入
using UnityEngine;
using UnityEngine.InputSystem;
/// <summary>
/// 鼠标输入
///
/// 作者: DY
/// 创建日期: 2025-01-09
/// 版本: 1.0
/// </summary>
public class 鼠标输入 : MonoBehaviour
{
    Mouse mouse = null;
    private void Start()
    {
        // 1. 获得当前鼠标设备
        mouse = Mouse.current;
    }

    private void Update()
    {
        // 2. 鼠标的抬起、按下、长按
        // leftButton、rightButton、middleButton、forwardButton、backButton
        // 鼠标左键的抬起、按下、长按
        if (mouse.leftButton.wasPressedThisFrame)
        {
            print("鼠标左键的按下");
        }
        if (mouse.leftButton.wasReleasedThisFrame)
        {
            print("鼠标左键的抬起");
        }
        if (mouse.leftButton.isPressed)
        {
            print("鼠标左键的长按");
        }


        // 3. 鼠标位置相关
        // 获得鼠标当前位置
        if (mouse.rightButton.wasPressedThisFrame)
        {
            print(mouse.position.ReadValue());
        }

        // 获得鼠标两帧之间的偏移量
        // print(mouse.delta.ReadValue());

        // 获得鼠标滚轮方向向量
        print(mouse.scroll.ReadValue());

    }

}
练习题1
场景中创建一个立方体,鼠标点中立方体,立方体变成红色,表示选中状态,此时可以缩放鼠标滑轮,让立方体放大和缩小。鼠标点击空白,立方体变为白色,表示没有选中。
using UnityEngine;
using UnityEngine.InputSystem;
/// <summary>
/// 练习题_物体选中
///
/// 作者: DY
/// 创建日期: 2025-01-09
/// 版本: 1.0
/// </summary>
public class 练习题_物体选中 : MonoBehaviour
{
RaycastHit hit;
GameObject currentObj;
private void Update()
{
if(Mouse.current.leftButton.wasPressedThisFrame)
{
Ray ray = Camera.main.ScreenPointToRay(Mouse.current.position.ReadValue());
if(Physics.Raycast(ray, out hit, 100,
1 << LayerMask.NameToLayer("Object"), QueryTriggerInteraction.UseGlobal))
{
if(hit.collider != null)
{
currentObj = hit.collider.gameObject;
currentObj.GetComponent<MeshRenderer>().material.color = Color.red;
}
}
else
{
if (currentObj != null)
{
currentObj.GetComponent<MeshRenderer>().material.color = Color.white;
currentObj = null;
}
}
}
if(currentObj != null)
{
if(Mouse.current.scroll.ReadValue().y > 0)
{
currentObj.transform.localScale += Vector3.one;
}else if(Mouse.current.scroll.ReadValue().y < 0)
{
if (currentObj.transform.localScale.x <= 1) return;
currentObj.transform.localScale -= Vector3.one;
}
}
}
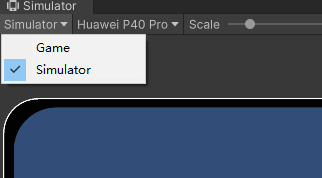
}4. 触屏输入
要想有触碰效果的话,需要将Game窗口改为Simulator
using UnityEngine;
using UnityEngine.InputSystem;

public class 触碰输入练习 : MonoBehaviour
{
    Touchscreen ts;
    private void Start()
    {
        // 触屏输入
        ts = Touchscreen.current;
    }

    private void Update()
    {
        // 判空
        if(ts == null) return;

        // 2. 得到触屏手指信息
        print(ts.touches.Count);

        // 3. 手指按下,抬起,点击
        if (ts.touches[0].press.wasPressedThisFrame)
        {
            print("手指按下");
        }

        if (ts.touches[0].press.wasReleasedThisFrame)
        {
            print("第一个手指抬起");
        }

        if (ts.touches[0].press.isPressed)
        {
            print("第一个手指长按");
        }

        if (ts.touches[0].tap.isPressed)
        {
            print("点击手势");
        }

        print("连续点击次数:" + ts.touches[0].tapCount);


        // 3. 手指位置信息
        print(ts.touches[0].position.ReadValue());

        // 手指刚按下是的位置
        print(ts.touches[0].startPosition.ReadValue());

        // 手指偏移位置
        print(ts.touches[0].delta.ReadValue());


    }
}
5. 手柄输入
6. 其他输入
像键盘、鼠标、触屏、手柄这些输入,还有摇杆、电子笔、传感器、陀螺仪、重力传感器、加速传感器、光照传感器等
遇到了在说,下面的连接是官方文档
7. InputAction
InputAction是Input System帮助我们封装的动作类,我们可以直接在Inspector窗口编辑想要处理的输入类型,当输入触发时,只需要把精力放在输入的逻辑处理上。
当我们再脚本中申明变量时,在Inspector窗口中,就可以选择你要输入的类型
[Header("Binding")]
public InputAction move;
[Header("1D Axis")]
public InputAction axis;
[Header("2D Vector")]
public InputAction vector2D;
[Header("3D Vector")]
public InputAction vector3D;
[Header("Button With One")]
public InputAction btnOne;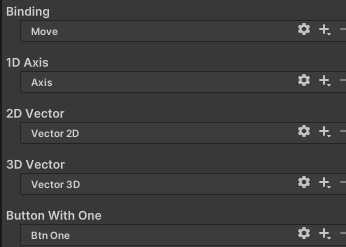
当我们点击齿轮时
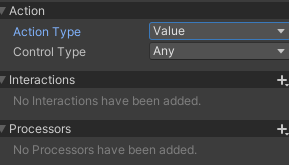
其中Action表示设置哪些输入
ActionType动作类型
Value:值类型(只是想要得到某个值,选择它)
Button:按钮类型(只是想要触发某个行为,选择它)
Pass Through:直通类型,与值类型一致。区别在与多个类型绑定Action时,值类型只能处理一个设备(主设备),而直通类型可以处理多个设备,它将得到的值发送给所有的设备
Control Type:筛选输入设备。 比如选择Vector2,则只有能够返回Vector2的输入设备才会被我们看到。
其中Interactions表示相互输入设置,用来处理特殊输入,比如长按、多次点击等。
当满足条件时才会触发这个行为(设置长按事件,点击次数等)
当我们按下右边的➕时,有5个输入效果:Hold、Multi Tap、Press、Slow Tap、Tap
我们点击后,可以通过代码中的3个函数(开始started、触发performed、结束canceled)得到触发相应事件
Hold:长按。当按钮按下时会触发started,若在松开按钮前,按住时间大于等于 Hold Time则会触发performed(时间一到就触发),否则触发canceled
Tap:在一段时间内松开触发。当按钮按下会触发started,若在Max Tap Duration时间内松开按钮,则会触发performed,否则触发canceled
SlowTap:按下时间大于等于Max Tap Duration时,并不会立刻触发performed,则是在松开的时候才会触发performed
MultiTap:用于多次点击,例如双击或者三连击。
TapCount为点击次数。
Max Tap Spacing为每次点击之间的间隔
Max Tap Duration为每次点击的持续时间(按下的持续时间)
Press:类似按钮的操作。
Press Only:按下的时候触发started和preformed。不触发canceled
Release Only:按下时触发started,松开时触发performed
Press And Release:按下时触发started和preformed,松开时再次触发started和preformed。不触发canceled。
Press Point:每个按钮都有对于的浮点值。比如 (未按下0 和 按下1之间)我们可以通过值得到按下的深度,当按下的值大于等于Press Point值则认为按钮按下。
其中Processors表示对得到的值进行一次加工
Clamp:将输入值钳制到[min,max]范围
invert:反转控件中的值(将值乘以-1)
Stick Deadzone:它会设置一个摇杆误触范围,在这个范围内,会把这个值归为0。当摇杆无法达到最大值,比如摇杆拉到底只能得到0.99,我们也可以设置死区,让它在这个范围内归为1。
当我们点击➕时
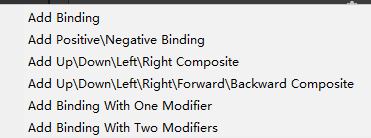
Add Binding:处理单按键输入的(比如:鼠标按下,键盘按下等)
Add Positive\Negative Binding:1D轴(比如:Input老输入系统中获得水平竖直热键,返回-1~1之间的一个值)
Add Up\Down\Left\Right Composite:2D轴(比如:老输入系统中水平和竖直热键组合在了一起,得到的Vector中的x、y分别表示两个轴)
Add Binding With One Modifier:双键组合(比如:Ctrl + C)
Add Binding With Two Modifier Composite:三键组合(比如:Ctrl + K + U)
当我们创建之后,通过Path来绑定映射。
代码控制
using UnityEngine;
using UnityEngine.InputSystem;
/// <summary>
/// InputAction研究
///
/// 作者: DY
/// 创建日期: 2025-01-09
/// 版本: 1.0
/// </summary>
public class InputAction研究 : MonoBehaviour
{
    public InputAction move;

    private void Start()
    {
        //  1. 启用输入检测
        move.Enable();

        // 2. 操作监听相关
        move.started += (callback) =>
        {

        };
        move.performed += (callback) =>
        {
            // 3. CallbackContext的信息

            // 当前状态:没有启用 Disabled、等待 Waiting、触发 Performed、结束 Canceled
            print(callback.phase);
            // 获取值
            // print(callback.ReadValue<float>())
            // 当前设备名字
            print(callback.control.name);

        };
        move.canceled += (callback) =>
        {

        };

    }


}
代码结合Add Binding
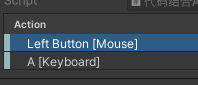
功能:实现鼠标左键按下,得到打印信息。键盘A键,也可以得到打印信息
Inspect面板中添加两个按键
using UnityEngine;
using UnityEngine.InputSystem;
/// <summary>
/// 代码结合AddBinding
///
/// 作者: DY
/// 创建日期: 2025-01-09
/// 版本: 1.0
/// </summary>
public class 代码结合AddBinding : MonoBehaviour
{
    // 实现鼠标左键按下,得到打印信息。键盘A键,也可以得到打印信息
    public InputAction action;

    private void Start()
    {
        action.Enable();
        action.performed += (callback) =>
        {
            print(callback.control.name);
        };
    }
}
代码结合Add Positive\Negative Binding
创建后,双击1DAxis,会出现一些属性
Negative:负面按键,例如 0~-1
Positive:正向按键,例如 0~1
MinValue:最小值
MaxValue:最大值
Which Side Wins:当同时按下时如何处理
Neither:返回MinValue和MaxValue的中间值
Positeive:返回maxValue
Negative:返回minValue
using UnityEngine;
using UnityEngine.InputSystem;
/// <summary>
/// 代码结合AddPositiveNegativeBinding
///
/// 作者: DY
/// 创建日期: 2025-01-09
/// 版本: 1.0
/// </summary>
public class 代码结合AddPositiveNegativeBinding : MonoBehaviour
{
    public InputAction axis;

    private void Start()
    {
        axis.Enable();
    }

    private void Update()
    {
        print(axis.ReadValue<float>());
    }

}
代码结合Add Binding With One Modifier

Modifier:第一个按键
Binding:第二个按键
图中表示,按下左shift + 鼠标左键组合,可以触发事件
using UnityEngine;
using UnityEngine.InputSystem;
/// <summary>
/// 代码结合AddBindingWithOneModifier
///
/// 作者: DY
/// 创建日期: 2025-01-09
/// 版本: 1.0
/// </summary>
public class 代码结合AddBindingWithOneModifier : MonoBehaviour
{
    public InputAction action;

    private void Start()
    {
        action.Enable();

        action.performed += (callback) =>
        {
            // 打印的是第二个按键的设备名
            print(callback.control.name);
        };
    }

}
8. 输入配置文件
它的本质是一个Json文件,有一套自己的规范。里面存储的是多个InputAction的集合。
结合PlayerInput组件,解析或编辑这个配置文件。通过这个配置文件统一管理用户的所有输入。
创建和打开配置文件
在Project面板上,右键创建Input Action文件。
这个文件是以 xx 为后最的json文件。
双击打开它,就可以对其进行编辑。
注意:一开始创建时,它的内容为空
{},当我们在窗口中编辑时,他就会把数据写入这个文件中。
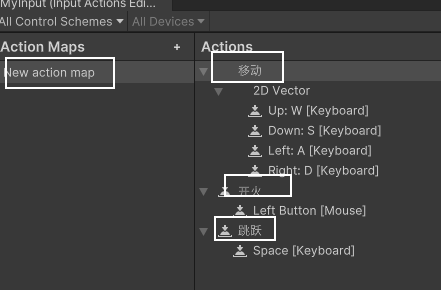
ActionMaps行动地图窗口
为配置文件中的行为进行分组配置,可以配置多套操作规范。
当我们在窗口中修改内容后,并保存。相应的,JSON文件也会保存。
下面代码中,这个行动窗口对应的就是maps数组,其中action数组对于的就是Actions窗口,bindings数组对于的就是 Binding Properties窗口。
{
    "name": "MyInput",
    "maps": [
        {
            "name": "Player",
            "id": "550b4697-2bf5-432e-afa9-56548221fc4a",
            "actions": [
            ],
            "bindings": [
            ]
        },
        {
            "name": "UI",
            "id": "b8988e80-00bf-4718-b026-47898d2e3c0b",
            "actions": [
            ],
            "bindings": [
            ]
        }
    ],
    "controlSchemes": [
        {
            "name": "New Control Scheme",
            "bindingGroup": "New Control Scheme",
            "devices": []
        }
    ]
}
Actions窗口
和InputAction的内容一样
Binding Properties窗口
和 InputAction的内容一样
顶部菜单窗口
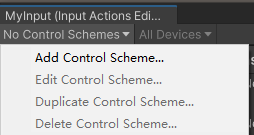
Control Scheme:控制在该主题下显示那些信息。比如我们添加一个 Control Scheme,并把这个主题中添加键盘,那么只有在
Binding Properties下勾选了Using in Control Scheme中键盘,我才会显示出来。否则则会被隐藏。
9. 输入配置文件生成c#代码
根据配置配置文件生成代码:当我们点击InputAction配置后,在Inspector上可以选择生成c#代码。我们可以自定义生成文件的类名、文件路径、命名空间。点击Apply就可以为我们生成c#代码。其中Revert是重置按钮。

生成完成后,可以通过代码去使用
using UnityEngine;
/// <summary>
/// 配置文件获得输入
///
/// 作者: DY
/// 创建日期: 2025-01-10
/// 版本: 1.0
/// </summary>
public class 配置文件获得输入 : MonoBehaviour
{
    MyInput inputActions = null;
    private void Start()
    {
        // 1. 创建我们刚刚在配置文件中生成的c#代码
        inputActions = new MyInput();

        // 2. 启用它
        inputActions.Enable();

        // 3. 使用
        inputActions.Newactionmap.开火.performed += (callback) =>
        {
            print("开火");
        };

        inputActions.Newactionmap.跳跃.performed += (callback) =>
        {
            print("跳跃");
        };

    }

    private void Update()
    {
        print(inputActions.Newactionmap.移动.ReadValue<Vector2>());
    }

}
10. Player Input
关联输入配置文件,它会自动解析这个配置文件,不需要手动生成c#代码然后去new。
PlayerInput组件面板参数
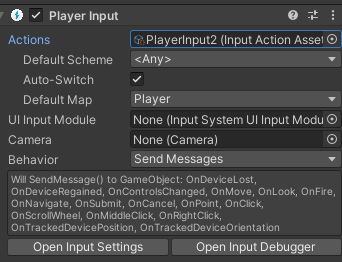
Actions:所关联的配置文件。当我们创建配置文件后,会出现下面3个选项
Default Scheme:显示那个主题。any表示所有主题都可以显示。
Auto-Switch:当设备切换时,是否自动切换设备输入
Default Map:当前选择哪套规范
UI Input Module:关联的UI输入模块
Camera:关联的摄像机(多人玩家分屏的时候,考虑此选项)
Behavior:行为(会在下文行为执行模式专门说明)
11. Player Input行为执行模式
我们接下来统一设置一下输入配置文件,这样能够很好理解下面的几种行为执行模式

1. Send Message
采用这种模式,需要将脚本挂载到与Player Input同一个对象上,当输入触发,它会去调用这个脚本相对应的函数。
这个函数的命名格式必须是 On + 行为名。
这种模式也提供了3种方法:当设备丢失、设备注册、控制器切换,它会去调用相应的函数
using UnityEngine;
using UnityEngine.InputSystem;
/// <summary>
/// SendMessages练习
///
/// 作者: DY
/// 创建日期: 2025-01-10
/// 版本: 1.0
/// </summary>
public class SendMessages1 : MonoBehaviour
{
    public void On移动(InputValue value)
    {
        print("触发了移动输入");
    }

    public void On开火(InputValue value)
    {
        print("触发了开火输入");
    }

    public void On跳跃(InputValue value)
    {
        print("触发了跳跃输入");
    }

    public void OnDeviceLost(PlayerInput playerInput)
    {
        print("设备丢失");
    }

    public void OnDeviceRegained(PlayerInput playerInput)
    {
        print("设备注册");
    }

    public void OnControlsChanged(PlayerInput playerInput)
    {
        print("控制器切换");
    }
}
2. BroadCast Messages
与Send Message是一致的,只不过采用BroadCast Messages模式,它会去找挂载了PlayerInput组件对象的子对象的脚本文件中的方式。
而采用Send Message模式,它只会在与挂载了PlayerInput组件对象下去查找脚本文件。
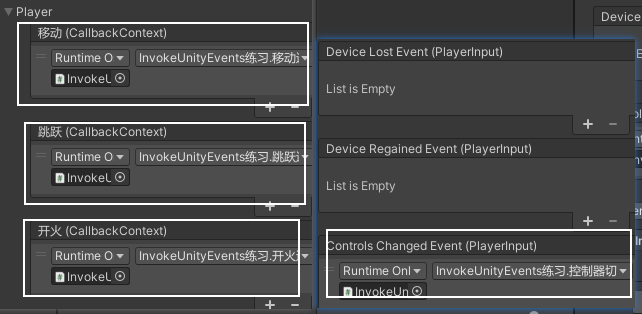
3. Invoke Unity Eventes
通过拖拽的方式去调用相对于的函数
它会events视图,我们可以自定义脚本,把相对于的脚本进行拖拽即可。
using UnityEngine;
/// <summary>
/// InvokeUnityEvents练习
///
/// 作者: DY
/// 创建日期: 2025-01-10
/// 版本: 1.0
/// </summary>
public class InvokeUnityEvents练习 : MonoBehaviour
{
    public void 移动逻辑()
    {
        print("移动");
    }

    public void 开火逻辑()
    {
        print("开火");
    }

    public void 跳跃逻辑()
    {
        print("跳跃");
    }

    public void 控制器切换()
    {
        print("控制器切换");
    }
}
4. Invoke C sharp Evetns
通过写脚本监听的方式去触发输入事件
using UnityEngine;
using UnityEngine.InputSystem;
/// <summary>
/// InvokeCSharpEvents练习
///
/// 作者: DY
/// 创建日期: 2025-01-10
/// 版本: 1.0
/// </summary>
public class InvokeCSharpEvents练习 : MonoBehaviour
{
    PlayerInput playerInput;

    private void Start()
    {
        // 1. 先要获得PlayerInput
        playerInput = GetComponent<PlayerInput>();

        // 2. 监听设备相关
        playerInput.onDeviceRegained += (callback) =>
        {
            print("设备注册");
        };

        playerInput.onControlsChanged += (callback) =>
        {
            print("控制器切换");
        };

        playerInput.onDeviceLost += (callback) =>
        {
            print("设备丢失");
        };

        // 3. 监听输入相关
        playerInput.onActionTriggered += (InputAction.CallbackContext context) =>
        {
            switch (context.action.name)
            {
                case "移动":
                    // print(context.ReadValue<Vector2>());
                    break;
                case "跳跃":
                    // print(context.ReadValue<Vector2>());
                    break;
                case "开火":
                    if (context.performed)
                    {
                        print("开火");
                    }
                    break;
                default:
                    break;
            }


        };
    }

    private void Update()
    {
        // 4. 可以通过update直接获得
        print(playerInput.currentActionMap["移动"].ReadValue<Vector2>());
    }
}
12. PlayerInputManager
主要用于制作多人游戏的,遇到了再去学习。不然学了就忘记了。
13. UGUI配合使用
新输入系统对UGUI是支持的(需要Input System UI Input Module),新输入系统不支持GUI
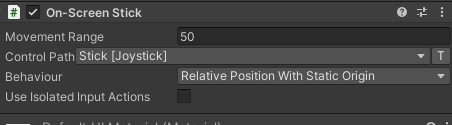
OnScreen组件相关
当我们想要是UI上制作一个摇杆,控制人物移动,我们可以直接给这个摇杆添加On Screen Stick组件,就可以实现摇杆的功能,这个组件下有一个映射关系。就是说当我们移动摇杆时,就会触发映射按键的值。
On Screen Button组件也是一个按键映射,当我们点击按钮后,相当于触发了 按键映射 的事件
14. Input Debug
新输入系统案例练习
1. InputSystem中专门用于任意键按下的方案
void Start()
{
    InputSystem.onAnyButtonPress.CallOnce((control) =>
    {
        print(control.path);
        print(control.name);
    });

}
2. 通过Json手动加载输入配置文件
public PlayerInput input;
void Start()
{
    // 1. 读取Json文件
    string json = Resources.Load<TextAsset>("PlayerInput").text;
    // 2. 将JSON文件解析为InputActionAsset
    InputActionAsset asset = InputActionAsset.FromJson(json);
    // 3. 指定actions
    input.actions = asset;
    // 4. 使用actions
    input.onActionTriggered += (context) =>
    {
        if (context.phase == InputActionPhase.Performed)
        {
            switch (context.action.name)
            {
                case "Move":
                    print("移动");
                    break;
                case "Scroll":
                    print("Scroll");
                    break;
            }
        }
    };

}


评论区